Cosmetic mold parts are generally composed of cores, thread inserts, cavities, molar core needles, cylinders, etc. Mold Components,Mold Spare Parts,Sleeves And Cores,Stainless Steel Mold Components Dayue Precision Technology , https://www.dayuechn.com
Most materials use 1.2343 and 1.3343 or S136 with high finish.
They generally need EDM processing, because the shape is special and irregular, so it is relatively precise.
Main uses: cosmetic packaging molds, cosmetic pump head molds, cosmetic blow molding molds, cosmetic bottle molds, etc.
Building your own stepper motor driver may sound straightforward, especially if it’s an open-loop system. However, since the driver directly impacts the torque and precision of the stepper motor, purchasing a driver from a reliable manufacturer can save significant time and effort.
Let’s break down the entire process of creating your own driver. First, during the product planning phase, you’ll need a team with the necessary expertise and knowledge to guide the design. Conducting market research is crucial to understanding the target audience and determining the best product to launch. Be familiar with basic concepts like stepper motor operation, desired features, pricing strategies, and market segmentation. For instance, will you focus on a 2-phase, 5-phase, unipolar, or bipolar driver?
Once you’ve decided on the type of driver, you’ll need to finalize the specifics. Consider the physical dimensions, required power supply, and additional features such as microstepping or vibration suppression. Without these details nailed down and thorough competitive analysis, setting a competitive price becomes challenging.
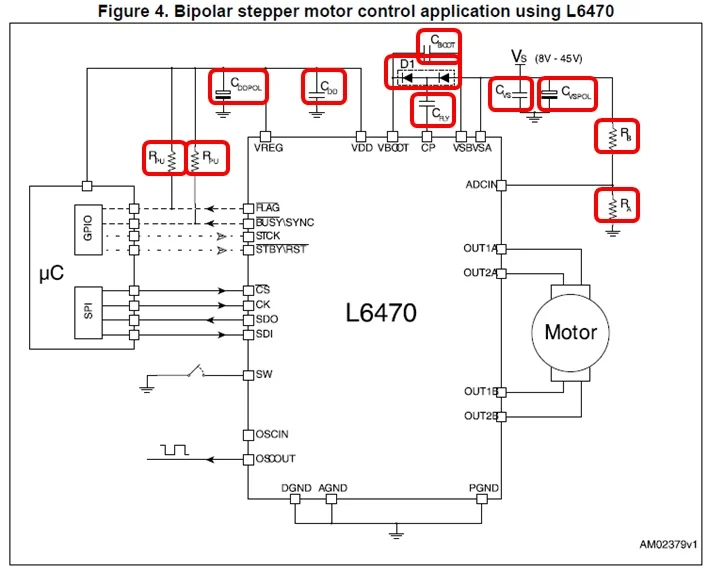
After settling on your driver design, the next step involves selecting a microcontroller or driver IC. Common options include ICs like the A4988 from Allegro, DRV8825 from Texas Instruments, or the L6470 from STMicroelectronics. Each has unique capabilities and requirements, so ensure you’re selecting the one that best fits your application.
Following the selection of your driver IC, sourcing the other components is essential. This includes capacitors, resistors, diodes, PCBs, connectors, pins, and FETs. Always adhere to the datasheet recommendations to guarantee proper connections and compatibility. Additionally, consult the stepper motor’s datasheet for critical parameters like rated current and wiring diagrams.
Below is an illustration of the L6470 driver IC:
Once you’ve chosen all the necessary components, it’s time to procure them and assemble the prototype.
However, this isn’t the end of the journey. After constructing the prototype, programming, configuring, testing, and troubleshooting are critical steps. Ensure everything works as expected—does the driver deliver the correct current to the motor? Does it respond correctly to commands from the PLC? When microstepping, does the motor maintain its torque and accuracy?
At this stage, rigorous testing ensures the prototype meets specifications without overheating. It also verifies functionality, passes heat generation, EMC, reliability, and abnormal condition tests. Significant adjustments can occur during this phase to optimize the design before launching it to the market.
### Comparison Between Building and Purchasing
| Method | Self-Build | Purchase |
|-------------------------------|---------------------------------------------------------------------------------------------|-----------------------------------------------------------------------------------------------|
| **Steps** | Perform market research → Design circuits & board layout → Source components → Build prototype → Test → Repeat if needed → Start CAD design → Set up production line or find contract manufacturers | Purchase driver → Test → Start CAD design → Place production orders |
| **Time Saved** | None | Up to 6 months or more! |
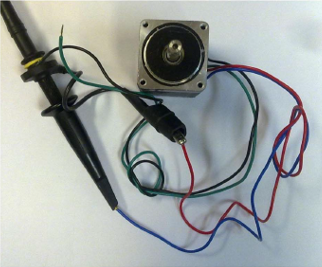
One significant distinction between building your own driver and purchasing one lies in the back EMF measurement process. Back EMF, generated by a moving motor, can influence torque output. If you're building your own driver, you’ll need to measure back EMF and adjust accordingly. However, if you purchase both the motor and driver from the same manufacturer, this step can be skipped since no tuning is necessary.
To measure back EMF, connect one motor phase to an oscilloscope channel, set the trigger value to the rising or falling edge, and adjust the threshold close to zero volts. Turning the motor shaft manually or via automation will generate the back EMF signal.
Understanding back EMF helps identify the speeds at which torque might drop. Manufacturers can then adjust the torque compensation curve to enhance performance.
### Torque Compensation Mode
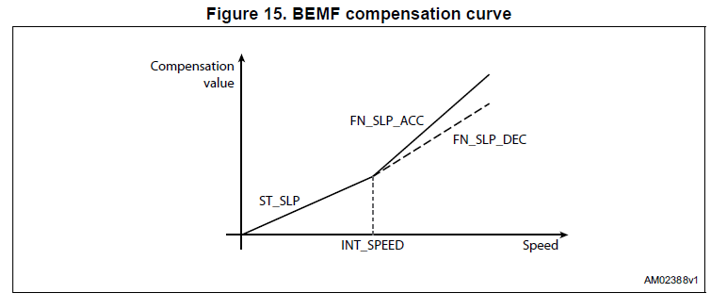
In torque compensation mode, data from back EMF measurements adjusts the voltage waveform applied to motor windings during acceleration and deceleration. This compensation curve uses two slopes: a starting slope (ST_SLP) for lower speeds and finer slopes (FN_SLP_ACC and FN_SLP_DEC) for higher speeds. Two distinct final slope values allow for different current levels during acceleration and deceleration, ensuring optimal torque output.
Only manufacturers who design both motors and drivers can offer this level of performance optimization.
### Cost Implications
While designing your own driver might seem cost-effective initially, there are hidden expenses such as labor, maintenance, design, evaluation, and troubleshooting. These factors make purchasing a driver more expensive but save valuable time.
Research suggests you could save around $64 to $105 by building your own driver rather than buying one. However, negotiating prices with manufacturers can reduce this gap. Buying both motors and drivers from the same trusted manufacturer often leads to better deals.
### When to Build vs. Purchase
#### Build Your Own Driver If:
- You have a skilled team, resources, and ample time.
- Cost is a primary concern.
- Your engineering team has the required knowledge.
- The product lifecycle justifies development costs.
#### Purchase From a Manufacturer If:
- Time constraints prevent driver design.
- You’d rather focus on other aspects of machine development.
- Guaranteed performance is critical.
- Supporting the product post-launch is challenging.
### Additional Benefits of Purchasing
Buying drivers offers flexibility in selecting products tailored to specific needs. For example, our CVD drivers come in four varieties:
- High torque
- Low vibration/noise
- Competitive pricing
- More time for machine design and assembly
- Consistent motor and driver performance
These benefits make CVD drivers ideal for applications requiring high precision, such as blood analyzers, sample analyzers, and laboratory equipment. They’re also popular for mass production due to their competitive pricing.
Don’t reinvent the wheel every time you face a new requirement. Experience optimal performance with our PKP series stepper motors paired with CVD drivers.
Ready to explore further? Learn more about the features and types of our CVD drivers in another article.
---
This approach emphasizes practical insights and real-world considerations, making it easier to grasp the nuances of building versus purchasing stepper motor drivers.