Shock Absorber Cover,Shock Absorber Dust Cover,Shock Dust Cover,Absorber Cover Ningbo Metal Sharing Supply Chain Management Co., Ltd , https://www.sharescm.com
If your Toyota's side mirror glass is cracked or shattered, you might not necessarily have to shell out money for a whole new side mirror assembly. In many cases, simply replacing the glass can restore your side mirror to perfect working condition.
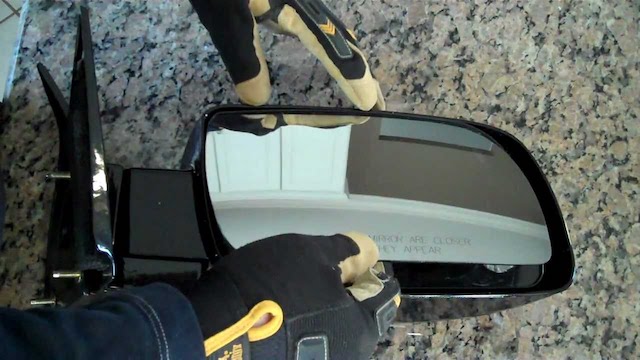
*Image credit: AutoandTruckMirrors*
### The Advantages of Replacing Only the Glass
Swapping out just the glass has several key benefits:
- **Faster:** Replacing the entire assembly can take anywhere from 1 to 3 hours. In contrast, replacing just the glass takes a mere 20 minutes.
- **Easier:** When replacing the whole assembly, you often have to dismantle parts of your car's interior, such as the door panel, to access the mirror. With just the glass, you don’t even need to step inside your vehicle.
- **Cheaper:** Opting for a glass-only replacement is usually significantly less expensive. For instance, the side mirror glass for a 2017 Toyota 4Runner costs approximately $175 less than purchasing an entire mirror assembly.
While these reasons might make you inclined to replace the glass, it’s crucial to confirm that the rest of the side mirror assembly is still functioning correctly.
### Inspecting Your Side Mirror Assembly
Checking your side mirror assembly is straightforward:
1. Examine the side mirror for any visible damage. Look for cracks in the housing, including under the mirror and around the pivot point.
2. Gently wiggle the mirror housing to ensure it’s securely attached. If it feels loose, it might just need tightening (provided the power mirrors still operate).
3. If your vehicle has power-adjustable mirrors, sit in the driver’s seat and test moving the mirror left and right, and up and down. If it fails to respond, inspect for mechanical damage or wiring problems. You might need to remove the broken glass to perform this check, though tilting the mirror can sometimes help you peek behind it.
If your assessment shows that the glass is the sole damaged component, replacing it should solve the issue. However, if the assembly itself is malfunctioning, a complete replacement will be necessary. Fortunately, you can carry out this task at home with the guidance provided here.
### Replacing Your Side Mirror Glass
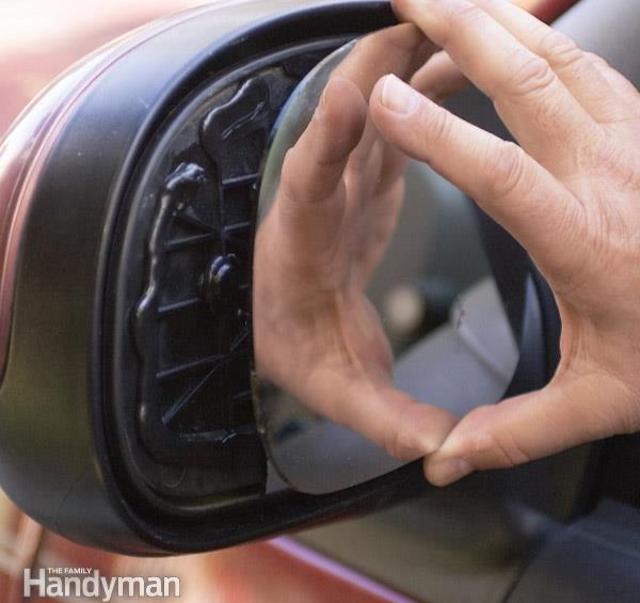
*Image credit: Family Handyman*
This step-by-step guide is based on the Toyota Camry but applies similarly to most Toyota models. For specific instructions tailored to your vehicle, YouTube offers plenty of resources.
#### Removing the Broken Mirror Glass
1. Order an OEM replacement side mirror glass from a reliable authorized online retailer like us.
2. Use masking or duct tape to cover the broken glass. This precaution protects your hands and minimizes the risk of injury or mess during removal.
3. Tilt the mirror all the way down and locate the two hooks at the back. Use a pick to detach them from their tabs.
4. Carefully remove the mirror from the housing.
#### Preparing the New Mirror Glass
A pro tip: It’s much simpler to install the new glass when the plastic housing is warm. Room temperature is ideal, but warming it slightly with a hairdryer can make it more pliable.
1. Put on thick protective gloves.
2. Peel off the masking or duct tape from the broken mirror and clean out all shards of glass from the housing.
3. You may need a razor blade to scrape away leftover adhesive tape.
4. Clean the back of the new mirror glass and the plastic housing using a plastic-safe cleaner, such as rubbing alcohol.
5. Attach the double-sided tape provided with the new mirror glass, spacing the pieces as far apart as possible.
6. Position the new mirror glass over the tape and press it firmly into the housing. Start with the most angled corner, followed by the next most angled corner, finishing with the gently curved edge.
#### Installing the New Mirror Glass
1. Double-check the back of the plastic housing to ensure all mounting pins are seated in their slots and aligned with the corresponding receptacles in the mirror assembly.
2. Gently snap the new glass into the mirror assembly. All components should lock into place seamlessly.
3. Test the new mirror using the power controls to confirm proper installation.
And there you have it! For additional DIY tips, explore more articles on our site.
- [How To Know When To Replace A Toyota Cabin Air Filter](#)
- [Can I Just Replace My Toyota’s Side Mirror Cover?](#)
- [7 Car Parts You'll Need To Replace Soon](#)
Feel free to reach out if you encounter any challenges along the way. Happy tinkering!